Thursday, October 11, 2012

The table saw would never be invented today

Foreward: I'm not advocating a ban on table saws. That would be silly, not unlike banning pencils because they could be used to put one's eye out.

The other day I was building a frame for a mirror in my house. As part of the process, I had to make some grooves in some dimensional lumber in order to hold the glass in place. To achieve this, I installed a dado blade in my table saw and passed the lumber over. This got me thinking of all the different ways that a table saw could horribly maim someone, and why, if it were invented today, the table saw would never be allowed to be sold.

I mean, it's basically just a blade sticking up out of a table, staring you in the face. Most tools have you placing your hands on the tool to operate it (freehand tools like a chainsaw or circular saw require two hands to keep the tool steady, and a stationary mitre saw is equipped with a deadman's switch so you have to keep one hand on the saw at all times,) but in the case of a table saw, you actually put your hands on the material you're passing through that blade. And unlike tools with a spring-loaded trigger, if you reflexively jump back, the saw just keeps going; the very nature of the way a table saw is used requires the motor to keep running without operator intervention.

So you've got this blade sticking out of a table, whirring away, happy to tear through anything that comes in contact with it. Modern saws have a couple safety devices, but these don't make the saw safe, only safer, and often these safety devices must be deliberately disabled in order to use the table saw to its fullest potential.

Splitter

As the table saw operates, the saw blade spins toward the operator. The front edge of the blade is moving into the table, which means as the blade chews through the material, it also pulls the material down onto the table. However, if the material catches the backside of the blade, it will be lifted up off the table. The splitter is attached at the back of the saw table. Its purpose is to hold the cut material apart so that it doesn't catch on the backside of the blade and get thrown into the operator's face. Unfortunately, if you're not cutting all the way through the material, it can't pass by the splitter. This means the splitter must be removed when making grooves.

Blade guard

In my case, the blade guard is a piece of clear plastic that is attached to the splitter. It sits over the saw blade and stops flying debris from being ejected up and away from the table. Since the blade spins toward the operator, most of the sawdust created by the saw blade ripping through material will be directed down into the body of the saw. However, sometimes material can be shot up off the backside of the blade; it will normally run into the blade guard instead of flying into the operator's face. The guard may also prevent someone from accidentally sticking their hand into the saw blade directly. However, this blade guard is attached to the splitter, so when the splitter has to be removed for ripping dado grooves, the blade guard goes with it.

Anti-kickback teeth

As the blade spins, it exerts a force on the material being cut. This force is mostly down into the table, but part of the force is also directed back toward the operator. This backward force increases as the top of the material approaches the top of the blade (for example, when cutting thick stock or cutting with a lowered blade height.) The reason this device is called "anti-kickback" and not "anti-pushback" is that a table saw's running blade can impart enough force to send the material back toward the operator quite vigorously. The teeth are spring-loaded and press down on the material as it passes by the splitter. They work to allow the material to pass only in one direction; if the material tries to run in the wrong direction, the teeth dig in. This, in theory, will resist the saw's attempt to punch the operator in the stomach with a chunk of wood. However, since the teeth are attached to the splitter, they, like the blade guard, disappear when the splitter does. This means the teeth are absent at their time of greatest need: when ripping grooves, as the saw blade's force is entirely toward the operator during this operation.

So yeah, I'd have to say that my table saw is the most dangerous tool I own. It's more dangerous even than my chainsaw, because at least the business end of my chainsaw is pointed away from me while I'm using it. If the table saw were invented today, there's no doubt in my mind that there would be overwhelming resistance to the sale of such a thing in retail stores, and you wouldn't find one outside of a licensed woodworking shop. To that I can only thank the powers-that-be that table saws hit the market in a different age, and now carry enough inertia to stay on the market. I mean after all, they (and far more dangerous tools) have existed for centuries, and the human race is still here.

It comes down to this: respect the table saw. The table saw giveth, and the table saw taketh away. It can be used in creative ways to do awesome things quickly, but it also packs a nasty bite which it uses to punish the careless and the ignorant.

Mediatomb handles my music collection with Mysql

Recently I've started streaming audio and video from my music collection to my ASUS Transformer tablet. For the most part this works really well, except that my music collection is rather huge (7355 tracks so far).

In particular, I'm using MediaTomb to index and stream the media over the network. What's really nice about MediaTomb is that there's no client configuration needed to find the server; the client discovers the server using uPNP. A close second is that MediaTomb uses the inotify facility on the system to detect and index files as they're added to the filesystem. This means that resource-intensive periodic scans of the filesystem are not necessary.

MediaTomb worked really well for streaming videos, but my video collection is rather small. When I tried to index and stream my music collection, it would choke. As it turns out, the default installation of MediaTomb on Debian uses SQLite3 to store the backend database. SQLite, put simply, doesn't scale. I've seen this in other applications as well; I seem to recall trying to deploy Bacula with a SQLite3 backend, with similar catastrophic results.

Anyway, because MediaTomb was trying to use SQLite, the database would get corrupted when trying to add more than a few hundred audio tracks. I tried adding them piecemeal, but it was to no avail; tracks would be missing, or would be in the list, but wouldn't play. Finally I decided it was time to get my hands dirty; MediaTomb will use MySQL, if you tell it to, and I already had a MySQL backend running on my server for other things.

So here's what I did (Thanks to Socrateos for the instructions):

  • Start by stopping mediatomb on the server. Then delete the old SQLite3 database, which by default is stored at /var/lib/mediatomb/mediatomb.db
  • Edit /etc/mediatomb/config.xml
    • Find the <storage> section
    • Change "sqlite3 enabled" to "no"
    • Change "mysql enabled" to "yes"
    • Set the "host", "username" and "password" fields in the mysql section. On my installation, the password attribute was missing, so I created it.
  • Save the file and exit
  • Next, create a database user:

    • $ mysql -u root -p 
    • mysql> create user 'mediatomb'@'localhost' identified by 'secret';
    • mysql> grant all on mediatomb.* to 'mediatomb'@'localhost';
    • mysql> quit
  • Now create the mysql database...:
    • $ mysql -u mediatomb -p 
    • mysql> create database mediatomb;
    • mysql> quit
  • ...and populate it
    • $ mysql mediatomb -u mediatomb -p < /usr/share/mediatomb/mysql.sql
  • Lastly, start the server
    • $ sudo /etc/init.d/mediatomb start
After this, I was able to connect to my MediaTomb server and scan my entire music library in at once. After MySQL hammered on my CPU for a few minutes doing thousands upon thousands of INSERTs, the database was complete and functioning.

Wednesday, May 30, 2012

In Hot Water


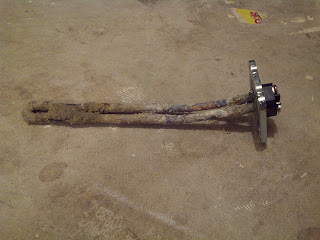
The retired water heater element

Introduction

So I did something new today; I replaced an element in my water heater. Despite dealing with pressurized water, pressurized air, and lethal voltages, I was not harmed by this experience. YMMV.

If you have an electric water heater, you might find this useful. If you have a gas water heater, you may find it interesting. If the thought of electricity or water leaks bothers you, don't be afraid to call a professional.

Why?

For the last few years, I've lived alone in my house. Recently, however, that has begun to change.

With more people comes more water usage, and after some complaints, I ran some numbers and concluded that the hot water didn't last as long as it should. I figured that I had an element that was either disabled, or malfunctioning.

Troubleshooting

I have an electric water heater with two elements. The upper element is close to the top of the tank and heats the top quarter or so of the water. The other element is very near the bottom and heats the rest. The reason for this is to speed recovery time; the bottom element will heat the entire tank evenly, but will take a long time, probably on the order of several hours, to do so. The upper element will heat the top quarter of the water volume to the desired temperature in a much shorter time. This facilitates waiting a short amount of time for a small amount of hot water, rather than waiting forever for any at all. Gas water heaters are able to transfer far more energy to the water than an electric unit, so they can get away with a single burner at the bottom of the tank.

Since I was living by myself and I take quick showers, I didn't notice that my hot water capacity was reduced, or if I did, it didn't cause me enough concern to investigate. However, once I gave it some thought, I decided to start my search with the lower element, since its failure would produce exactly the symptoms I was seeing: a small amount of hot water with only a short wait for more after the water ran cold.

I started by exploring the possibility that I had turned off the lower element in the past and simply forgotten about it. As I said, I use very little hot water compared to the average family, so keeping 150L hot at all times would have been a waste. Each element has its own thermostat, since they operate independently, so I removed the lower access cover on the tank to check the appropriate one. As it turns out, I have two different thermostats. The upper one was calibrated in degrees, so you could set your tank to the appropriate temperature. The lower one, however, simply had demarcations of "hot", "A", "B", "C", and "hottest". The dial was set to "A", so I turned it to "B" to see if that would have any effect.

It didn't. Since the water would transition from hot to cold, rather than hot to warm, and the lower thermostat wasn't turned down all the way to start with, I figured the cause might be more serious than a simple maladjustment. So on the theory that the lower element had failed, I tried a simple resistance check. Now, a heating element is basically a large wire, so a working one should have a low resistance, while a resistance of zero or some very high number would indicate a malfunction. After turning off the power to the heater and opening the upper and lower access covers, I disconnected the upper element to isolate it for measuring. An ohmmeter connected across the terminals indicated 0.019 ohms of resistance, which gave me a reference from a known-working element.

I then turned my attention to the bottom element. However, after disconnecting it, the ohmmeter recorded an open circuit across the terminals. This reinforced my theory that the lower element had failed altogether.

So now I'm looking at replacing a heating element in an electric water heater, something I've never done before.

Parts Acquisition

I started with a trip to the nearest big-box hardware store. They had several heating elements on the shelf, with various different power and voltage ratings, and a couple different fitting styles. The data plate on my water heater indicated that it used 3000W elements, and operated on 240V. Armed also with a photograph of the part of the element visible from the outside of the tank, I was able to select the appropriate replacement. While I was at it I noticed that the store also sold various water heater thermostats. Since the thermostat on my faulty element was not actually calibrated for temperature, I decided to replace it as well, since then the two elements could work in concert to keep all the water in the tank at the same temperature, and I'd actually know what that temperature was.
Air in, water out
Air in, water out

Purging the tank

Unlike a gas water heater, in which the burner is kept separate from the water, the elements in an electric heater are immersed in the water they are heating. This improves the efficiency of heat transfer from the heating element to the water, but it also means that replacing an element requires draining the entire tank. This isn't as easy as you might think, especially when you're dealing with a ten-year-old tank. The drain is near the floor, and since I don't have a floor drain in the basement, I needed to drain it through a garden hose. However, the nearest drain was the laundry sink, which is above the level of the drain in the tank. Somehow I needed to make water flow uphill.

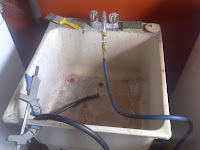
Now this is a purge kit
Enter the plumbing supply store. For about $6.50, I got a couple fittings that let me connect my air compressor to the faucet on the laundry sink. This allowed me to push air through the hot water lines, into the top of the tank, and force the water out of the drain. At 10psi it took about 20min to push all the water out of the tank.

Now, if you have a little compressor designed for, say, a brad nailer, then this isn't the best option for you. You may very well end up burning out your compressor, since you're going to try and pressurize a 150L tank to 10psi. Of course, if you have something a little bigger, say one designed to fill a 75L tank, you're good to go.

Removing the element

Once the tank was drained, I was ready to remove the heating element. Four bolts secured this particular element to a flange on the side of the tank, and once those were removed, a little twist with a screwdriver was all it took to break the element loose. I didn't know what to expect as I pulled the element out of the tank, but the corroded condition of it didn't surprise me in the slightest. What did surprise me, however, was the sediment at the bottom of the tank. I mean, I knew to expect some sediment, but I had no idea what it would look like, and I certainly didn't expect to see what I saw.
The sediment in the tank

Clearing the sediment

After getting over the sight of ten kilos of granola in the bottom of my hot water tank, I set to work cleaning it out so I could see what the inside of the tank looked like. Turns out the opening for the element is large enough to admit the wand of my shop vacuum, but just barely. I could put the wand straight in, but the tank has a concave bottom, and twisting it around to get to all the nooks and crannies in the bottom of the tank was impossible.
What I vacuumed out of the tank

After a little searching for a solution I came up with a piece of scrap hose from my rain barrel, which I taped to the end of one of the wands. This had a little curve at the end which made it possible to remove nearly all the silty crap from the bottom of the tank. Afterward I was able to see that the inside of the tank was in pretty good shape, surprisingly so for a tank of this age. Since I'm in the middle of replacing my kitchen, I was glad I wouldn't have to fork out another few hundred dollars for a new water heater right now.

Installing the new element

Installing the new element turned out to be simple. Once the access hole was clear of crud, I placed the seals. There's one that goes in the hole and one that seals the element's flange against the tank flange. The thermostat just sits against the tank wall to measure the temperature, and it's held there by a bracket that bolts on with the element. Once all that was in place, I connected the wires, using the photo I'd taken earlier as a guide. The instructions warned against over tightening the bolts, so I tightened them up as much as I dared without reefing on them.

Testing

I wanted to test for leaks without having to fill up the tank with water, since it would mean draining the entire tank to fix a leak. I would rather fill the tank with air and use a soap spray to check for leaks, as it's less messy. Fortunately, I had just the tool for the job. The little collection of fittings I'd made for purging the tank would also serve this purpose. After closing the drain on the tank and all the other hot water valves in the house, I pressurized the hot water lines to 10psi and sprayed the element with a little soapy water. The appearance of some foam prompted me to take a few more turns with the ratchet. After being satisfied that the element was properly sealed, I decided to remove a little more sediment before I filled the tank completely.
Margaritas anyone?

Flushing

By opening the drain line before turning on the water supply, I was able to splash some water into the tank and flush a little more of the sediment out. Thankfully, water heaters draw their hot water out of the top, so the crap that sits in the tank doesn't end up coming out of the faucet. However, it also means that your water heater will slowly fill with crud and eventually fail, as mine did, so it's a good idea to flush the tank once a year. This can be as simple as filling a bucket from the tank drain, which will flush out some of the sediment. Various sources have told me to turn off the water supply and drain the tank halfway or more before turning the water back on, effectively stirring up the sediment to allow it to flush better. All I know was I was able to get some really nasty looking water by letting the first few litres of water go straight out the drain. Once the drain was running clear I closed it and allowed the tank to fill by leaving a hot water faucet open until the air rushing out was replaced with water. After letting the tank sit under pressure for an hour and finding no unwelcome moisture, I closed the circuit breaker and let it heat up.

Conclusion

So, I now have far more hot water that I did before. The tank hasn't exploded or leaked all over the floor, I don't see any sparks or smell any smoke, and I have enough water to draw a proper bath. Oh, and I also have ten-odd kilos of icky granola-looking crud that leaves me thinking, "If that's what settles in the tank, what about the stuff that doesn't settle?"

Cheers.

Tuesday, January 3, 2012

On the Science vs the Art

This year I volunteered to help out with the tracksetting for our local cross country ski club. Initially, it was to satisfy the dream of four-year-old boys everywhere: to drive a bulldozer. However, it turns out that, despite the complexities of the vehicle involved, learning to operate it was the least difficult part.

The machine in question is a Kässbohrer PB-140DR. Unfortunately, since it's apparently a rare beast, and I've yet to take any photos of it, I have no pictures to post. I can say, however, that it's basically a smaller version of the grooming machines you see running up and down ski hills everywhere. It's a twin-tracked tractor that has a blade on the front for moving snow, and an implement hitch on the rear that can be used to drag either a packer bar or a hydraulically-powered tiller. Both rear implements have a pair of pans that can be pressed into the snow to set tracks for classic-style cross-country skiing. The result is that the machine can drive over a trail covered in virgin snow, and turn it into a four-metre wide surface that's excellent for classic and skate style skiing, all in one pass.

As the machine passes over the snow, its weight and the cleats on the tracks pack the snow down. However, the tracks leave an unskiable surface. The packer bar is pressed into the snow by the machine; it packs the surface flat, then combs it and presses in one or two tracks for classic skiing.

When the surface is already packed, and the snow has hardened by poor weather, it can be rejuvinated with the tiller. This replaces the packer bar and does all the same things, but it also has a hydraulically-driven toothed shaft that spins at high speed. It rips into the snow and shreds it back into a powder, which is then packed and combed.

This machine is from the 1980's, and unlike more modern machines, is still steered by a pair of control levers in the cab, much like a bulldozer. Having never operated such a machine before, I assumed, probably like most other people, that one would simply grab a lever in each hand and give 'er. However, there are two reasons why this would be a bad decision. Firstly, you need a hand free to operate all the other levers and switches you need to operate while grooming a trail (the levers that move the blade, the knob that adjusts the pressure on the packer bar, the switches that raise and lower the pans and activate the tiller, etc.) because like I said, the machine's from the 1980's; all of the controls are manual. Secondly, the levers are rather sensitive, so it's actually easier to keep control of the machine if you grab both levers in one hand and steer with a twist of the wrist.

I was rather surprised to find that after a morning I'd pretty much gotten the hang of driving the machine down a trail. I was even more surprised to find out that this was just the easiest part, and that I was about to start down the path of learning the art of tracksetting. Things like knowing what effect increasing or reducing the amount of pressure exerted by the packer bar on the snow, or how slow I need to travel while operating the tiller to produce the right consistency of snow. Also keeping an eye on the forecast so that I know whether there's any point in trying to set track (it can't be done when the snow's wet, which can happen from warm weather or rain,) and working out what route to take so that I set the most amount of track the most efficiently (as in not running over trails more than once, since the machine can't be driven over set track without resetting it.)

So this is going to be learning experience for me, but not in the way I'd expected. I started because I wanted to learn to operate a cool piece of machinery, but in the end, I'm going to stick with it becuase it's going to allow me to learn something that can't be codified on paper, something I can only learn through experience.

Now let's just hope the snow sticks around long enough...